
Shisha stitch is wonderful stitch that has a long and rich history associated with Indian embroidery. Most people have seen little mirrors secured to Indian textiles and for this reason it is also known as mirror work. This form of embroidery has travelled and is frequently found in the traditional textiles of not only India, but also Pakistan, Afghanistan, China, and throughout Asia.
Today embroiderers around the globe have adopted and adapted this stitch to contemporary techniques. It is most often used to secure not only mirrors but also small flat objects, coins, stones shells etc to their work. I have also seen cut pieces of CD attached to embroidery using shisha stitch. You can cut an old CD into interesting shapes with heavy duty scissors. You can also cut up all sorts of coloured plastics
If you use real shisha do be aware that it is glass. As you stitch take care not to run your fingers along the side as it can cut you.
How to work Shisha Stitch
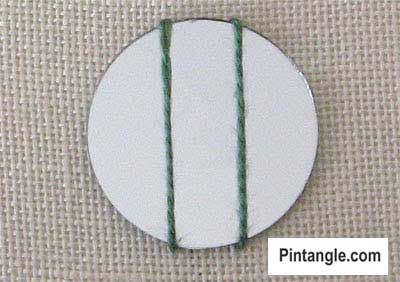 Commence by securing the glass with two long straight vertical stitches placed at thirds across the disk. If the glass slips get a little piece of double sided sticky tape and stick it to the back of the glass. Make sure the tape is small enough not to poke out from behind the edge of the glass. It does not have to be a big piece just a piece big enough to hold the glass from slipping.
 Imagine that the disk is the face of a clock. Bring the needle out at the right side of the disk at approximately 4 o’clock.
Take the needle over the first bar stitch and pass it under the thread as illustrated.
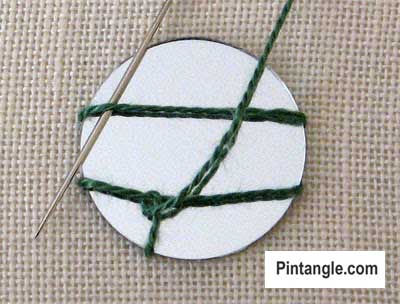 Pull the needle through. The thread will form a loop around the bar.
Take the needle over the second bar stitch and pass it under the thread as illustrated.
 Pull the needle through. The thread will form a loop around the bar. Take the needle through the fabric as you have created the section of a frame of stitches that will secure the shisha in place.
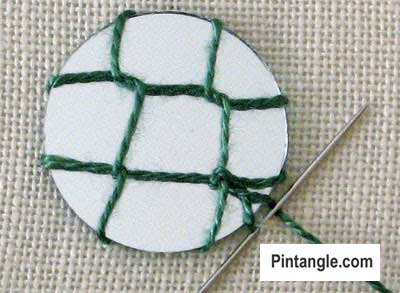
Repeat these steps to create the second part of the grid. It looks at this stage a little like a tic-tac-toe grid which is why some people call shisha stitch, anchored tic-tac-toe. You now have the foundation for a frame of stitches that will edge the shisha glass
 The next step is to bring the needle out at the point indicated in the photograph.
 Take the needle over and then thread it under the point where the foundation threads cross. Pull the needle through.
 Make a small stitch along the side of the disk and wrap the thread under the needle as illustrated. Pull the needle through.
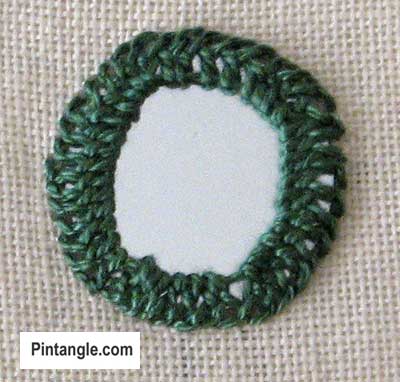 Then repeat taking the needle over and then thread it under the point where the foundation threads cross. Move along and repeat this around the disk.
Work your stitches close together as these form a frame that contains the mirror.
You can work in a clockwise or anti clockwise direction. Choose what ever direction you are comfortable with.
Have you seen my book?
My book The Visual Guide to Crazy Quilting Design: Simple Stitches, Stunning Results shares detailed practical methods on how to design and make a crazy quilt. Topics such as fabric choice, tricky challenges like balancing colour, texture and pattern, and how to create movement to direct your viewers eye around the block are covered in detail. I also explain how to stitch and build decorative seam treatments in interesting and creative ways. My book is profusely illustrated as my aim is to be practical and inspiring.
Stitchers templates
My templates aim to help you take your stitching to the next level. Designed by an embroiderer for embroiderers. With them you can create hundreds of different hand embroidery patterns to embellish your seams with flair. These templates are easy to use, made of clear plastic so you can position them easily and are compact in your sewing box.
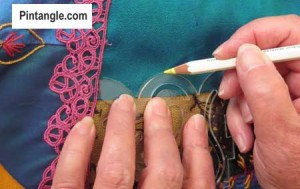 These are simple to use. You simply position the template in place and use a quilter’s pencil to trace along the edge of the template. Stitch along this line to decorate the seam. I have a free ebook of patterns to accompany each set which illustrates how they can be used.
TO ORDER your Stitchers Templates
Crazy Quilt Templates set 1 you will find here
Crazy Quilt Templates set 2 you will find here

Pingback: TAST Catch Up 1 out of 5
Dear Sharon b
I like your stitch better than the embroiderers guild method http://www.embroiderersguild.com/stitch/stitches/shisha.html where you make the back stitch into the previous loop.
Theirs gives a pretty outline but is much more fiddly and time consuming and difficult to get right. Your method gives a perfectly good outline and I can always go over the edge with a blanket stitch or chain stitch if I want.
I also like your metthod of securing the mirror. Again it is less fiddly than the traditional way and a lot more effective especially for circular mirrors.
Thank you for this site. I have only just discovered you and like your writing very much.
All the best
elderflower
I have been experimenting with shisha work and it is always great to see new ways of doing it! Thanks for the tutorial.
Xephyr your brave – I hope you enjoy them- if you have a place to post images please do so and let us know. Or join the flickr group and we can see what you do.
Hi Sharon, thanks a ton for this great visual tutorial. I had it done perfectly by the second try. The first one was a bit messy :D. Your TAST concept is great and I spent the whole night going thru the flickr pool! I’m going to start playing with the stitches from week 1. Thanks again!
If you don’t want to work with glass or cut up cds but do want the shine, paillettes work nicely. mjtrim.com has more than 20 colors and several finishes. They are thinner than cds, so depending on what thread you use you may find it easier to stack a couple together.
Thanks for the different way to attach shisha glass. It was easier than then way I’d been using and more secure. Enjoy your lessons a lot, thanks!
Hi Sharon, I’ve posted my shisha stitch here – http://randomapplique.blogspot.com/2007/09/bookmark-i-need-to-work-on-witty-title.html Took me a while to get the hang of it but I got it now! 🙂 A very useful stitch to know I think, lots of possibilities. Thanks for the lesson!
Hi Sharon, here’s my shisha sample http://faffingabout.blogspot.com/2007/09/tast-shisha.html
Hi Sharon
The new blog looks good!
I have been playing catch up – half chevron, portugese stem stitch, scroll stitch, wheatsheaf and a first attempt at shisha stitch on my blog and Flickr account.
I really look forward to the new TAST stitch each week! – Thank you so much for running this challenge.
Luci F
http://luciscreativeadventures.blogspot.com/
http://www.flickr.com/photos/luci_f/
I’m finally up to date with all my stitch samples. Thanks for all the work you do on TAST.
My shisha stitch tryout piece is here: http://tenar72.wordpress.com/2007/09/03/tast-35-shisha-stitch/ but it is nothing special this time.
Tenar
Hi Sharon, the Shisha Stitch was another new one for me. The mirrors are not available in my area but I found some nice spangles to use ….. different sizes and different colors. I’m still having a bit of a problem but will continue working with this as I’ve been checking out the other blogs and gotten some great ideas especially from crazystitcher. You can see my attempt here:
http://normasneedlez.blogspot.com
http://flickr.com/photos/helenad/1296564228/
My shisha stitch is here http://flickr.com/photos/helenad/1296564228/ and in the group pool on flickr. It is a really useful technique for attaching things to fabric. I remember being told that shisha work reflected the importance of water in dry hot places though I don’t know if this is a true interpretaion of its regional significance. Anyway I think the idea of waterwas at the back of my mind and inspired my little sampler.
Hi Sharon
I have my Shisha Stitch sample up on my blog and
I forgot to comment on your photo before it looks great.
Doreen
http://doreeng.blogspot.com
My Shisha stitch is up on my blog. I had a few problems and had to cheat with the red one and glue it as it fell out but I learnt to add more cross stitches higher up which is what I did for the smaller ones. I used flat backed crystals as I couldnt find the shisha morrors I was sure I had.
http://backvalleyseasons.blogspot.com
Done! http://vivian-institches.blogspot.com/
I’ve always wondered how this was done, it is easy. I can see other applications: stones, buttons, agates.
Hi, I have the shisha stitch on my blog. Thank you for the instructions again Sharon ! It is still a challenge to follow the tast every week 🙂
Hi Sharon, i think the pic is a great idea, I came prepared today, complete with cup of tea, just as well, cause you kept me busy for a while.
Thankyou for the mention and the link back to my blog
Take care
hi
maybe your photo on the sidebar and a cuppa next to chatty posts?
i think the cuppa is part of your signature.
shishas although new to me should be easy since i’m a weaver.
now watch me eat my words.
neki desu
Hi Sharon, It is your fault that I have done no housework today. I have been having far too much fun with shishas.
Thanks for helping me get it right at last.
http://crazyqstitcher.wordpress.com/
Thank you for these instructions.
We had this shisha theme a few weeks ago on a German message board.
I found a few instructions which were similar to yours but the first stitches were not anchored there and I was not able to attach my coin in this way. The stitches always slipped down from it.
I will try it again in your way, I think this will work much better.
Thanks again.
Kissy
ciao sharon, tanti auguri per il nuovo blog…
e grazie per aver illustrato così bene come fissare gli specchietti.
ti abbraccio matilda
I’m confused, how do I gt to your dictionary for stitches?
sharon
it is so fun to see a pix of your smiling face.
i read your blog daily for inspiration and giggles, whatever comes first!
truly a winner for me!
i did want to comment on the hyperlink color choice of your new space. i find it difficult to read except the first TAST that seems to be in aa eye friendly brown. the rest read as a very light minty green and are hard for my eyes to read as it looks “grayed out”.
i use a mac. not sure if that is the cause but i never noitced this in your old space.
thanks again fo rall of your great work and sharing!