
Closed base needlewoven picot or needlewoven picot leaf stitch when complete is very leaf-like so you can use it any floral motif. This is a stitch that stands proud of the fabric and I think you’ll find it amusing and cute. It takes a little time to work and quite a bit of thread but it is worth it when you see people reach to touch it.
This is a closed base needlewoven picot. You can make them quite long and they look very effective if worked en-masse. If you work them in a circle they form flower-like petals.
Use a blunt tapestry needle so that as you weave the threads you do not split the threads by accident.
How to work Closed base Needlewoven Picot

Place a pin in your work with the pin emerging from the fabric where you want the base of your picot to be.

Bring the thread out at the base to the right of the pin. Take the thread up and behind the pin side as illustrated.

Bring the thread out, a little to the left, at the base of where the pin emerges from the fabric. Take the thread and wrap it behind the pin.
Have the thread cross the pin so that it wraps from the left side under the pin to the right as illustrated.

Begin weaving at the top by sliding the needle from the right to the left, picking up the two outer threads. You do not pick up the middle thread.
Pull the thread through firmly but not too tight. Turn the needle and continue weaving by sliding the needle from left to right picking the middle thread. The two outer threads are not picked up.
 Pull your thread through and continue in this back-and-forth motion. As you weave, use the needle to pack the picot so that it sits firm.
 Continue weaving until the picot is packed firmly to the base.
Take the thread to the back and secure it with two small back stitches.

Remove the pin and you have a freestanding needle woven closed base picot.
It looks like a leaf that stands proud of the fabric!
Have you seen my 3rd set of Stitchers Templates?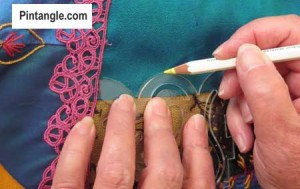
As someone who loves crazy quilting and embroidery, I designed these templates with other stitchers in mind. This third set is oriented towards designing floral patterns and sprays. With my templates, you can create hundreds of different patterns to apply to your stitching and crazy quilting projects. They are easy to use, totally clear so you can position them easily. They are compact in your sewing box.
For more information, about them and the free ebook of patterns that they come with, visit the information pages in the shop where you can also purchase them.

Here are my samples of this stitch.
http://hobbysewing.blogspot.com/2020/12/tast-45-beyond-tast-45.html
Here is the closed base needlewoven picot
http://flowerkaleidoscope.blogspot.com/2012/11/tast-12-closed-base-needlewoven-picot.html
Here is the closed base needlewoven picot. I liked this stitch.
http://eclecticlamb.com/2012/11/08/week-44-closed-base-needlewoven-picot/
i’ve managed to get a bit more stitching onto my wonderful husband’s christmas stocking using this stitch.
if interested in seeing: http://simpletosublimepapernapkinpoetry.blogspot.com/2012/11/tastclosed-base-needlewoven-picot.html
🙂
libbyQ
Lovely stitch this week. A floral offering from me:
http://berrybakewell.blogspot.co.uk/2012/11/tast-week-44-closed-base-needlewoven.html
With all the hassle of changing my website adress, I forgot to share my last TAST stitches
http://www.himade.net/?p=1778
And this week stitch
http://www.himade.net/?p=1741
I really love dimensional embroidery 🙂
Hi Sharon,
Due to teaching commitments, I was way behind on my TAST! But, now I’m good again. You can find my latest addition to the mandala on: http://stitchinfingers.ning.com/profile/JessicaGrimm.
Best wishes, Jessica
hiya everyone, another steep learning curve 🙂 xx liz xx http://stitchinfingers.ning.com/photo/botanical?context=user
Here is my sample of closed base needle wiven picot stitch..
http://sadalas.blogspot.in/2012/11/tast2012-closed-base-needlewoven-picot.html
“I haven’t had a lot of time to play the TAST” should be “I haven’t had a lot of time to play with TAST stitches”
I haven’t had a lot of time to play the TAST, but I have managed to do a little of all the stitches I missed. I’ll try to get to see everyone else’s posts later this weekend or during the week… depends on how my computer behaves.
http://airynothing.net/Blogs/anblog/2012/11/03/a-bit-of-tast
I love woven stitches. http://www.flickr.com/photos/playswithfibers/
I’ve stitched a few closed base woven picots next to the drizzle stitches on my grey linen sampler:
http://fat-quarter.blogspot.nl/2012/11/closed-base-woven-picot.html
Hi everybody
My post for the woven picot stitch is here:
http://dufall.blogspot.com/2012/11/tast-semaine-44-tissage-laiguille-picot.html
Here’s my bit for this week 🙂
Barbara
http://stitchinfingers.ning.com/photo/wk44-bbb-birds-butterflies-and-bunting?context=user
This week’s stitching:
http://textileexplorations.blogspot.de/2012/11/beaded-hedebo-edge-and-needlewoven.html
I made some beetles which are at
http://crazyqstitcher.wordpress.com/
Nice stitch.
So much to learn:
http://queeniepatch.blogspot.jp/2012/11/tast2012-week-44.html
http://stitchinfingers.ning.com/photo/tast2012-week-44-bush?context=user
An other nice stitch!
http://6stem5.canalblog.com
Back in August I created a flowering cactus for my desert pebble (CD).
http://threads-and-patches.blogspot.com/2012/08/flowering-desert-cactus-tutorial.html
Hi All – Here’s my example of the Woven Picot (slightly blurry – sorry). Sharon – I look forward to next year’s design challenge.
http://stitchinfingers.ning.com/photo/rose-corsage?context=user
Hi Sharon,
I have started working on this stitch, my trials are on my blog.
http://jizee6687.wordpress.com/category/tast-2012/44-needle-woven-picto-leaf-stitch/
Thank you,
Chitra
Hi everybody,
This time, I am not late for the chalenge. you will find my work here
http://pierrespapiersciseaux.blogspot.fr/2012/11/tast-44-feuille-en-picot-tisse.html
Hi Sharon, I’ve only done a small example this week !
Been so busy ! My son left this morning bound for the caribbean on a cruise ship, playing in a band and will be gone for 5 months ( crying !!!) Do better next week !!!
hugs
Chris Richards
xxx
http://ellascraftcreations.blogspot.co.uk/2012/11/tast-2012-needlewoven-picot-stitch.html
Hi Sharon & Friends, my posts for the stitches 40 & 41.
Lots of fun! Thank you all 😉
http://embroiderland.blogspot.com.br/
Wasn’t easy to find a pin in my house long enough to weave around but I finally settled on a flat-headed flower pin usually used in quilting. A little awkward but it worked! Here is my set of gour woven picot “leaves”: http://210920746822434353.weebly.com/1/post/2012/11/take-a-stitch-tuesday-2012-week-forty-four.html
http://latha-mycreations.blogspot.in/2012/11/tast-week-44-needle-woven-picot.html
My sampler for woven picot stitch.
This is a wonderful stitch, I like all dimensional stitches. Sure I will use it again. Thanks for sharing, Sharon. Here is my attempt: http://fabricfusion.blogspot.co.at/2012/11/tast-44-needelwoven-picot-stitch.html
I love this stitch (base closed and non closed) and ????I am delighted that the Tast continue Next year.
?http://carrementcrazy2.canalblog.com/archives/2012/11/01/25474865.html
I had to work fast this week as tomorrow I am headed to Houston, TX for the International Quilt Festival. I am so excited to be going.
I love the texture and dimension of this stitch and I am happy that the challenge will continue on. Thanks Sharon
http://playfulstitching.wordpress.com/2012/10/31/closed-base-needlewoven-picot-stitch/
Early this week! – here is my sample of the closed base needlewoven picot stitch:
http://debbies-doings.blogspot.ca/2012/10/tast-week-44.html
Of course not ready to post anything. This is just to say, “I LOVE this stitch! I am sooooo excited about all these dimensional stitches!!”
This was a great stitch…I really enjoyed doing it. For my quilt block I tacked the end down. http://timeusebybernice.wordpress.com/
I love this stitch! Very cool!
http://princessbubblescreates.blogspot.ca/
There’s only one wonky old stitch in my post today, so I shared a few other details on my doodle cloth:
http://fat-quarter.blogspot.nl/2012/10/old-stitches-on-my-doodle-cloth.html
This week I have an almost new stitch to learn!
Sharon
Here is my sample for this week:
http://shamiatcraft.blogspot.in/2012/10/tast-week-44-needle-woven-picots.html