
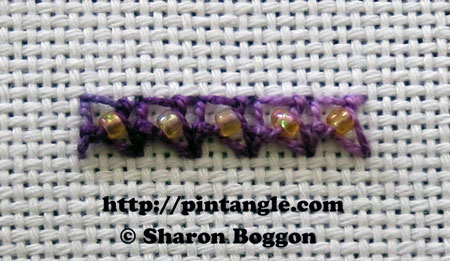
Beaded Eastern Stitch is a variety of Eastern Stitch. It is not difficult to do as you simply add a bead to loop made between the two bars. Since the stitch sits within a square it is particularly suitable on any grid like pattern. It is just a case of looking at it and arranging units of the stitch in interesting ways.
How to work Beaded Eastern Stitch
To work Beaded Eastern Stitch use a size 26 tapestry needle. Since the eye of a tapestry needle is long you can thread perle #8 and Perle #5 through the long eye. However the needle itself is thin which means you can add a bead to your working thread as you stitch. The Beading is not done afterwards but during the stitching process. This tip is key to success with this type of beaded embroidery.
You need to know the standard eastern stitch to be able to understand how this beaded version works. If you need a reminder see the tutorial for Eastern stitch
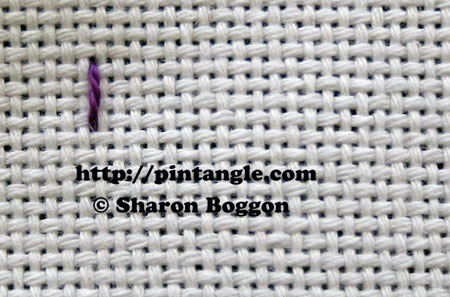 Work this stitch from left to right. When working this stitch it needs to kept at a fairly loose tension. Make a vertical straight stitch at the left side of an imaginary square.
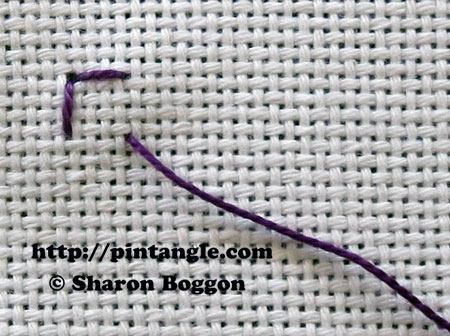 Make a horizontal straight stitch at the top of an imaginary square.
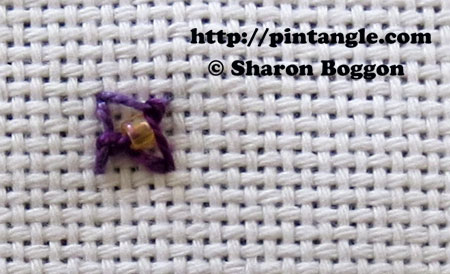
These two stitches are the foundation bars of each unit of eastern stitch.Taking the needle diagonally across the back of the fabric, bring the thread up to the front the fabric, in the bottom right-hand corner as illustrated.
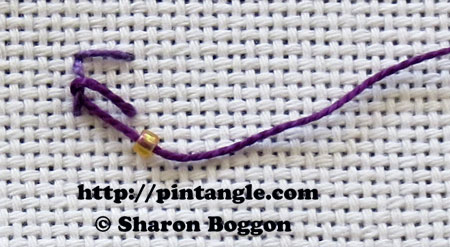 Take the needle over the top and then slide it under the vertical stitch. When you slide the needle under the bar make sure it points towards the bottom of the square. Pull the needle through so that it forms a loop over the vertical bar stitch as illustrated. You are not going through the fabric but lacing the bar.
Thread on a bead then move to the horizontal bar and slide the needle under the horizontal stitch.
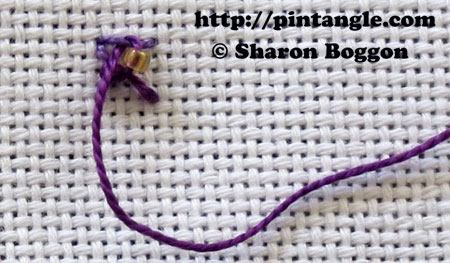 Make sure the thread is kept to the right of the needle so that when you pull it through it forms a loop over the horizontal stitch as illustrated
Take the thread through the fabric at the bottom right-hand corner.
 Bringing the needle out at the top left corner of the next stitch and repeat the process along a line or to fill an area.
You can work along a line or a curve or as individual units to create patterns.
I hope you enjoy experimenting with this variety of Eastern Stitch.
![]() Subscribe to Pintangle and have it delivered to your inbox
Subscribe to Pintangle and have it delivered to your inbox
You can have Pintangle delivered to your inbox by using the ‘Subscribe’ feature in the sidebar. Just enter your email address, and when you get the confirmation email make sure you click ‘yes’ and you are all set! If you are on a mobile, cell phone or tablet you will need to scroll to the bottom to find the ‘subscribe’ field.
Have you seen my Stitchers Templates?
As someone who loves crazy quilting and embroidery, I designed these templates with other stitchers in mind. With my templates, you can create hundreds of different patterns to apply to your stitching and crazy quilting projects. They are easy to use, totally clear so you can position them easily. They are compact in your sewing box.
For more information, see what they look like, find out about the free ebook of patterns visit the information pages in the shop where you can also purchase them.

Hi Sharon,
Beaded Eastern stitch sampler is on my blog-
http://jizee6687.wordpress.com/category/tast-2014/6-100-beaded-eastern-stitch/
Thank you,
Chitra
What a lovely stitch to celebrate this mile stone with! I have enjoyed these first 100 stitches so much.
http://queeniepatch.blogspot.jp/2014/02/tast-100-beaded-eastern-stitch_17.html
My catch up stitches 95-100 and links to some from previous years. I can’t say I have done every one but quite a lot… and very enjoyable. Thanks Sharon.
http://linsartyblobs.blogspot.co.uk/2014/02/tast-95-100.html
I stitched Eastern stitch and beaded Eastern stitch side by side on my 14 count Aida sampler. And I made a combo with detached chain stitches. I wrote about it on my blog with a link to the finished sampler:
http://fat-quarter.blogspot.nl/2014/02/eastern-stitch-beaded-eastern-stitch.html
Now I can say I stitched all 100 stitches!
Congrats Annet – it is not easy to stitch every one. Thanks for being such a regular reader too
100!! I can’t believe it! Congrats – may you have many, many more stitches.
Here is my input.
Mary
http://theworkingneedleandpen.wordpress.com/2014/02/15/saturday-15-february-2014/
Thanks Mary it’s a milestone –
http://210920746822434353.weebly.com/1/post/2014/02/take-a-stitch-tuesday-stitch-100.html
Mine looks a bit off but I have few beads that will fit over my embroidery needle and they are pretty big so I hope that is why the beads like a little overwhelming… I need to find a solution for this needle/bead incompatibility!
Carol as I said int eh post buy a size 26 tapestry needle – it works honest
I have blogged my TAST stitches from 95-100 – in two posts. I had forgotten to come back here after posting the first set.
Though I printed out the TAST 4 stitches as they came, I have to create them now.
Thanks Sharon for hosting the tutorials again.
For someone who intended to be ‘occasionally’ working on them, you have been a very busy girl.
http://crazyqstitcher.wordpress.com/
Yes my “occasionally” has sort of over taken me – but I still sony want to promise a weekly stitch – just incase
I’ve enjoyed every stitch so far, Sharon! Thanks for sharing your knowledge with us all.
Here’s my catchup TAST stitches 95 through to 99.
https://morecoldtea.wordpress.com/
Barbara
Hi Sharon,
Congrats on your 100th stitch!
I am following the stitches, will rejoin after completing some personal work. I have finished up to 94 stitches.
they are here-
http://jizee6687.wordpress.com/category/tast-2012/
http://jizee6687.wordpress.com/category/tast-2013/
Thank you,
Chitra
congratulations Sharon 100 stitches you have shared, must own up to not having done them all but I do plan to. Used the beaded chain on my latest crazy piece and had lots of very nice comments .
Thanks for the instructions Sharon. I can hardly believe that it has been 100 stitches! I think I have done most of them! If only I remember them all! You can the Eastern and beaded Eastern stitch that I did at http://princessbubblescreates.blogspot.com
Hi Angela thanks for being so loyal and participating all this time. I have always enjoyed you particular unique take on some of these stitches
Hello Sharon, I am proud to tell that I have made all 100 stitches up to now, without leaving out a single one, starting from January 2012.
Of course, only a few stitches in one row – my blog:
http://anaslua2.blogspot.de
Hi Anneliese yes I thought you would be able to wave and say that congratulations it is wonderful achievement
100 TAST stitches, congrats! The beaded eastern stitch is lovely, I’m sure I’ll enjoy stitching it this week.
If I’m right, I stitched 99 of the 100 TAST stitches. I have photo albums on my Flickr page for TAST 2007:
http://www.flickr.com/photos/28957501@N04/sets/72157629848118262/
TAST 2010:
http://www.flickr.com/photos/28957501@N04/sets/72157623440647201/
TAST 2012:
http://www.flickr.com/photos/28957501@N04/sets/72157628912935867/
TAST 2013:
http://www.flickr.com/photos/28957501@N04/sets/72157632604860295/
and TAST 2014:
http://www.flickr.com/photos/28957501@N04/sets/72157640179368985/
I also write about my TAST experiments on my blog with the label TAST:
http://fat-quarter.blogspot.nl/search/label/TAST
I wrote my very first post about TAST in January 2008 (only in Dutch, nobody was reading it at the time!):
http://fat-quarter.blogspot.nl/2008/01/herringbone-stitch.html
Annet I have watched your stitching all this time- thanks for sharing and it has been lots of fun
Your work is so very very beautiful! My total admiration.
Is it possible to receive your blog daily via email, as it is Sharon’s? If so, please add me to that list.
So much inspiration and motivation!
Thank you,
Anna Brown
Anna you need to subscribe yourself and approve the subscription – it is to prevent people simply adding you to their list and spamming you. the subscription button is in the blog side bar
yes I LIKE ::::
have a good day
michele
Congratulations! The 100th stitch is a beauty! Looking forward to stitching it!